Precise angle cuts are a crucial aspect of many woodworking and construction projects. Whether you’re working on trim molding, furniture, or DIY projects, achieving accurate angles is essential for seamless joints and professional-looking results. One tool that can significantly assist in achieving these precise cuts is a miter saw.
In this comprehensive guide, we will focus on a specific angle: 75 degrees. While various angles are commonly used in woodworking, the 75-degree angle holds particular relevance in specific projects. Understanding how to cut a 75-degree angle on a miter saw will equip you with the knowledge and skills to tackle a wide range of tasks effectively.
Mastering the technique of cutting a 75-degree angle opens up possibilities for creating beveled edges, chamfers, and complex joinery. Whether you’re a professional woodworker or an avid DIY enthusiast, this guide will provide you with the necessary insights and step-by-step instructions to accomplish precise cuts at this specific angle.
By the end of this article, you’ll have a clear understanding of the importance of precision in angle cuts, the role of a miter saw in achieving accurate results, and the specific applications where a 75-degree angle comes into play. So let’s dive in and explore the fascinating world of cutting a 75-degree angle on a miter saw.
Understanding the Basics of a Miter Saw
A miter saw, also known as a chop saw or a drop saw, is a versatile power tool commonly used in woodworking, carpentry, and construction projects. It is designed to make precise angled cuts, primarily for creating miters, bevels, and compound angles. The miter saw consists of several key components and features that enable accurate cutting.
- What is a miter saw? A miter saw is a stationary power tool with a mounted circular saw blade that can be lowered onto a workpiece to make cuts. It is typically used for crosscuts, miter cuts (angled cuts in the horizontal plane), bevel cuts (angled cuts in the vertical plane), and compound cuts (a combination of miter and bevel cuts).
- Primary uses of a miter saw:
- Trim carpentry: Miter saws are commonly employed for cutting trim moldings, such as baseboards, crown moldings, and picture frames, to achieve precise angles and seamless joints.
- Furniture making: Miter saws are ideal for creating clean and accurate cuts on furniture components, such as table legs, chair rails, and frames.
- Framing and construction: Miter saws are valuable tools for cutting studs, rafters, and other framing materials, ensuring precise angles and tight joints.
- Key components and features:
- Circular saw blade: The blade, typically made of carbide-tipped teeth, rotates at high speeds to make the cuts.
- Blade guard: A protective cover that shields the blade when not in use, ensuring safety during operation.
- Fence: A vertical surface that supports the workpiece and provides stability and accuracy during cutting.
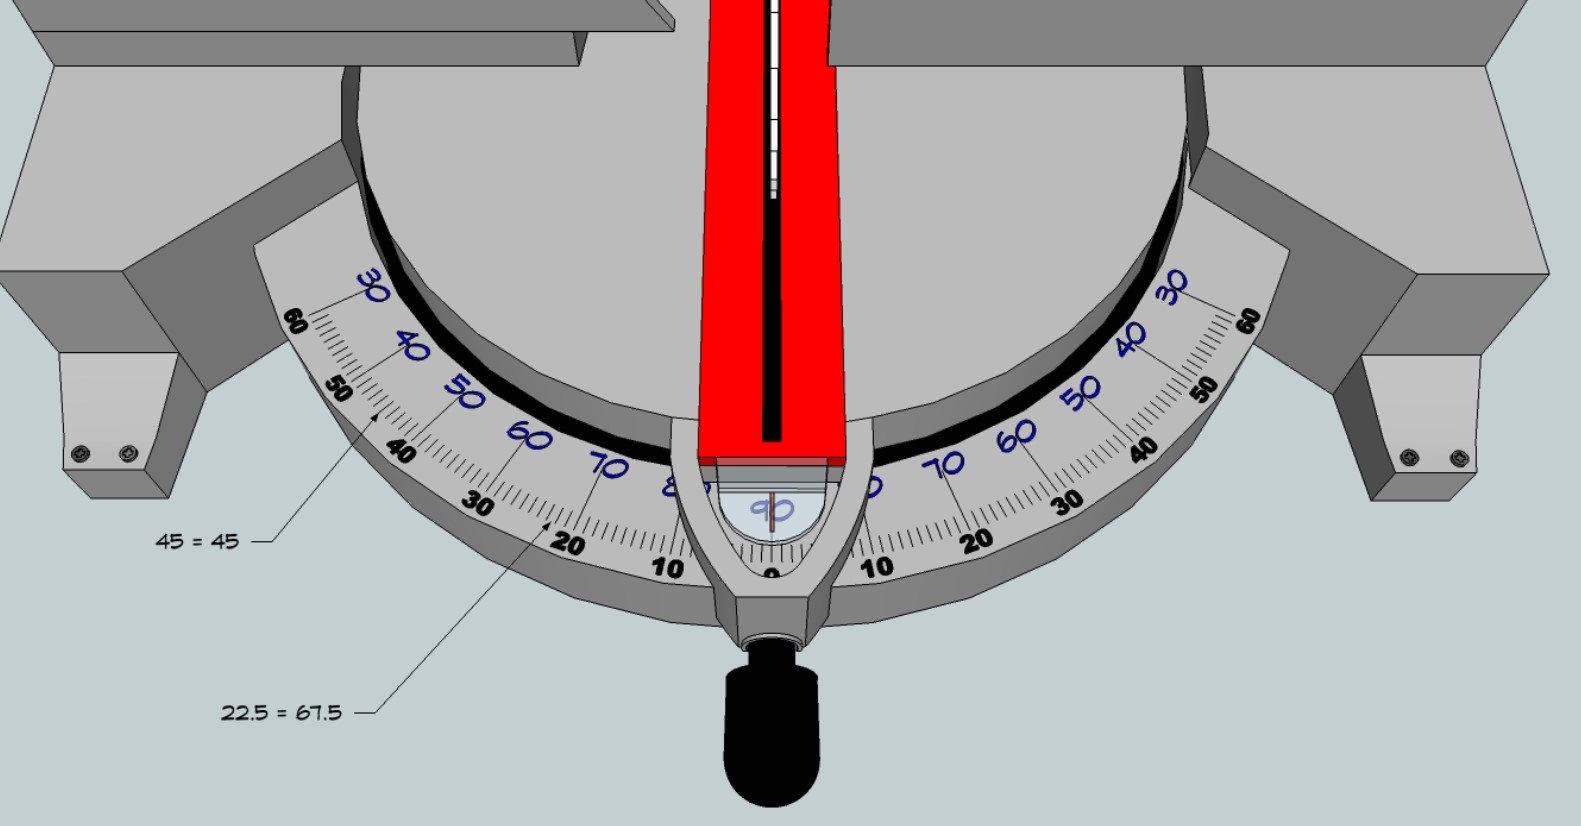
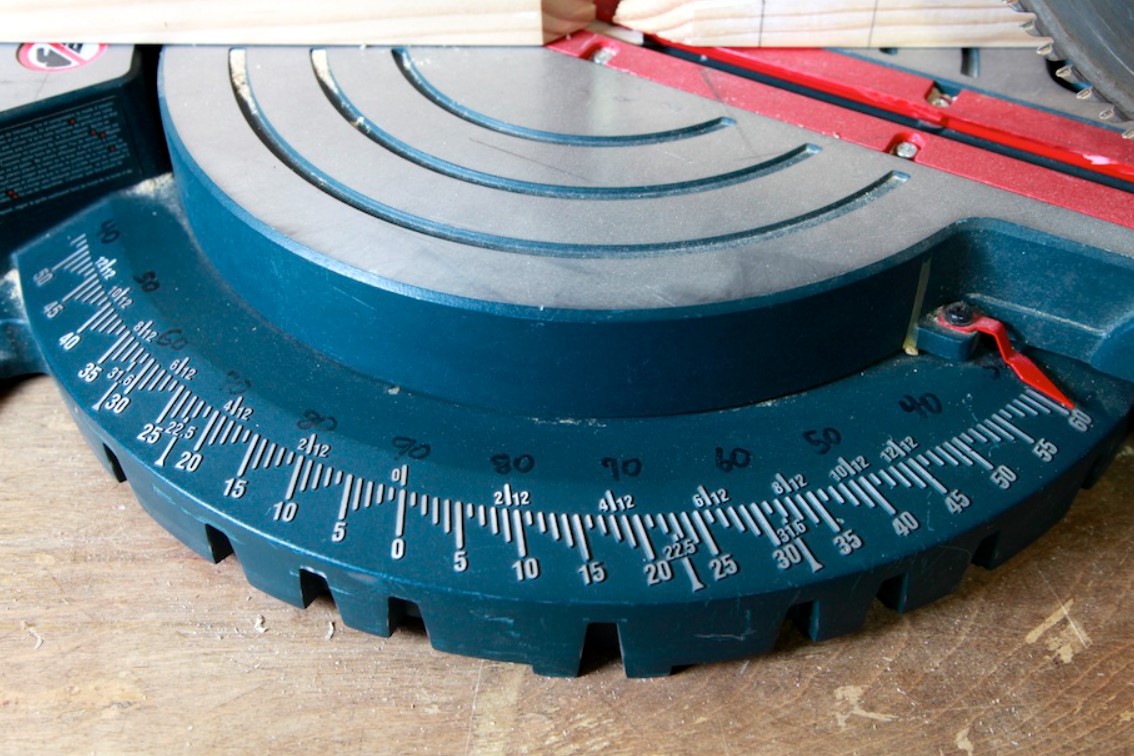
- Miter gauge: A protractor-like device used to adjust the angle of the saw blade for making miter cuts.
- Bevel adjustment: A feature that allows the saw blade to tilt horizontally, enabling bevel cuts at various angles.
- Positive stops: Pre-set angles commonly used in woodworking, such as 45 degrees or 90 degrees, which allow for quick and accurate adjustments.
- Laser guide: Some miter saws come equipped with a laser guide system that projects a beam onto the workpiece, providing a visual reference for accurate cuts.
Understanding these fundamental aspects of a miter saw will lay the groundwork for effectively utilizing its angle adjustment capabilities. In the following sections, we will delve deeper into the process of cutting a precise 75-degree angle on a miter saw.
Selecting the Right Blade and Setting Up the Miter Saw
To achieve precise and clean cuts at a 75-degree angle on a miter saw, it is crucial to select the appropriate blade and ensure proper setup. This section will discuss the importance of blade selection for angle cuts, provide guidance on choosing the right blade for a 75-degree angle, and explain how to set up the miter saw for accurate cuts.
Importance of choosing the appropriate blade for angle cuts: Selecting the right blade for angle cuts is essential for achieving clean, smooth, and accurate results. The blade’s tooth configuration, material, and size can significantly impact the quality of the cut. Consider the following factors when choosing a blade:
- Tooth count: Blades with a higher tooth count provide finer cuts, ideal for precision work.
- Blade material: Carbide-tipped blades are commonly preferred for their durability and ability to maintain sharpness.
- Blade size: Ensure that the blade diameter matches the specifications of your miter saw for proper installation and operation.
Selecting the right blade for a 75-degree angle cut: When cutting a 75-degree angle, it is recommended to use a blade specifically designed for fine woodworking, such as a crosscut or a combination blade. Look for the following features:
- High tooth count: Opt for a blade with a higher tooth count, typically 80 or more, to ensure clean and precise cuts.
- Fine teeth configuration: Blades with fine teeth minimize tear-out and provide smoother finishes.
- Carbide-tipped teeth: Choose a blade with carbide-tipped teeth for enhanced durability and longevity.
Properly setting up the miter saw for accurate cuts: Before making the 75-degree angle cut, ensure that your miter saw is properly set up for precise and safe operation. Follow these steps:
- Secure the miter saw on a stable work surface, ensuring it is level and firmly anchored.
- Check the blade’s alignment and adjust if necessary to ensure it is perpendicular to the saw’s table.
- Verify that the miter gauge is properly calibrated and aligned, allowing for accurate angle adjustments.
- Adjust the bevel angle to 0 degrees (perpendicular to the table) before setting it to 75 degrees.
- Use a combination square or a protractor to verify the accuracy of the miter and bevel angle settings.
- Ensure the workpiece is securely positioned against the fence and clamped if needed to prevent movement during cutting.
By selecting the right blade and setting up your miter saw correctly, you lay the foundation for achieving accurate and clean 75-degree angle cuts. In the next sections, we will explore the process of marking, measuring, and adjusting the miter saw to achieve precise cuts at this specific angle.
Marking and Measuring for a 75 Degree Angle Cut
Precise marking and measuring are vital steps in achieving accurate and clean 75-degree angle cuts on a miter saw. This section will explain the significance of precise marking and measuring, describe the process of marking the workpiece for a 75-degree angle cut, and provide tips and techniques for accurate measurement to ensure a clean cut.
Significance of precise marking and measuring: Accurate marking and measuring are essential for ensuring that the cut is made at the desired angle, resulting in properly aligned joints and seamless connections. Precise marking and measuring help avoid errors, minimize material wastage, and contribute to the overall quality of the finished project.
Process of marking the workpiece for a 75-degree angle cut: Follow these steps to mark the workpiece accurately for a 75-degree angle cut:
- Identify the reference edge: Determine which edge of the workpiece will be aligned with the saw’s fence.
- Measure and mark the length of the cut on the reference edge using a measuring tape or a ruler.
- From the marked point, use an adjustable bevel square or a protractor to measure and mark a 75-degree angle across the width of the workpiece.
- Ensure that the angle line intersects with the edge of the workpiece accurately.
Tips and techniques for accurate measurement: Achieving precise measurements is crucial for accurate cuts. Consider the following tips and techniques:
- Use high-quality measuring tools: Invest in a reliable measuring tape, ruler, or combination square with clear markings and a sturdy construction.
- Measure and mark on the correct side of the line: When using a measuring tape or ruler, align the zero point precisely with the edge of the workpiece to avoid inaccuracies.
- Double-check measurements: Always verify your measurements by measuring multiple times to minimize errors.
- Utilize light and shadow: To improve visibility, position the workpiece and the measuring tool in a way that utilizes light and shadow to make the markings more distinct.
- Use a sharp pencil or marking knife: Ensure that your marking tool is sharp for precise and fine markings on the workpiece.
By focusing on precise marking and accurate measurement techniques, you will enhance the quality and accuracy of your 75-degree angle cuts. In the next section, we will delve into the process of adjusting the miter saw to achieve the desired 75-degree angle for cutting.
Adjusting the Miter Saw to a 75 Degree Angle
Achieving accurate 75-degree angle cuts on a miter saw requires proper adjustment of the tool. In this section, we will walk through the steps of adjusting the miter saw to a 75-degree angle, highlight specific features or adjustments required for this angle, and provide troubleshooting tips for common issues encountered during angle adjustment.
Steps for adjusting the miter saw to a 75-degree angle: Follow these steps to adjust your miter saw to a 75-degree angle:
- Loosen the bevel lock or release lever, allowing the saw blade to tilt.
- Rotate the bevel adjustment handle or knob to set the saw blade at 75 degrees.
- Check the angle gauge or digital display on your miter saw to ensure the accuracy of the angle setting.
- Once the 75-degree angle is set, securely tighten the bevel lock or release lever to lock the blade in place.
- Double-check the angle using a protractor or combination square to verify the accuracy of the adjustment.
Specific features or adjustments for a 75-degree angle: Adjusting to a 75-degree angle may involve specific features or adjustments on your miter saw, such as:
- Positive stops: Some miter saws have positive stops at common angles. Ensure that the positive stop for 75 degrees is aligned properly and engaged.
- Detents: Detents are preset positions that provide increased accuracy for specific angles. Check if your miter saw has a detent for 75 degrees and ensure it is aligned correctly.
Troubleshooting tips for common angle adjustment issues: When adjusting the miter saw to a 75-degree angle, you may encounter certain issues. Here are some troubleshooting tips:
- Stuck or tight adjustment: If the bevel adjustment handle or knob is difficult to turn, ensure that the bevel lock is fully released. Apply a lubricant, if necessary, to facilitate smoother adjustments.
- Inaccurate angle readings: If the angle gauge or digital display on your miter saw is providing inaccurate readings, check if it requires calibration or consult the user manual for troubleshooting instructions.
- Blade misalignment: If the blade appears misaligned when set to a 75-degree angle, double-check that the blade is perpendicular to the table when at 0 degrees and adjust accordingly. Also, ensure that the saw’s components are properly aligned and tightened.
By carefully following the steps for adjusting the miter saw and troubleshooting any issues that arise, you can ensure the accurate and precise cutting of a 75-degree angle. In the next section, we will explore the importance of safety precautions and best practices when operating a miter saw.
Safety Precautions and Best Practices
Safety should always be a top priority when operating a miter saw. This section will emphasize the importance of safety, provide a comprehensive list of safety precautions to follow, and offer tips and best practices to ensure a safe and successful cutting experience.
Importance of safety when operating a miter saw: Operating a miter saw involves sharp rotating blades and powerful machinery, which can pose significant risks if not used correctly. Safety precautions are crucial to prevent accidents, injuries, and potential long-term consequences.
Comprehensive list of safety precautions: Follow these safety precautions when operating a miter saw:
- Read and understand the manufacturer’s instructions and guidelines before using the miter saw.
- Wear appropriate personal protective equipment (PPE), including safety glasses, hearing protection, and a dust mask.
- Ensure the miter saw is placed on a stable surface and securely anchored.
- Keep the work area clean and free from obstructions.
- Avoid distractions and maintain focus while operating the miter saw.
- Keep your hands at a safe distance from the blade, using push sticks or other tools when necessary.
- Never reach over or behind the blade while it is spinning or in motion.
- Wait until the blade comes to a complete stop before making any adjustments or removing cut pieces.
- Avoid wearing loose clothing, jewelry, or anything that could get entangled in the saw.
- Disconnect the power supply before performing any maintenance or blade changes.
- Store the miter saw in a secure and locked area, out of reach of children.
Tips and best practices for a safe cutting experience: In addition to following safety precautions, consider the following tips and best practices:
- Position yourself in a stable stance with a firm grip on the miter saw handles.
- Always use a sharp and appropriate blade for the material being cut.
- Let the blade reach full speed before making contact with the workpiece.
- Make sure the workpiece is firmly secured against the fence and the table.
- Support long or heavy workpieces with additional stands or supports.
- Use clamps or hold-downs to secure small or irregularly shaped workpieces.
- Use the laser guide or mark the cutting line on the workpiece for improved accuracy.
- Allow the blade to complete the cut before releasing downward pressure.
- Clean the work area regularly to prevent dust buildup and maintain visibility.
By adhering to these safety precautions and following the recommended tips and best practices, you can ensure a safe and successful cutting experience with your miter saw. In the next section, we will delve into the technique of executing the 75-degree angle cut.
Executing the 75 Degree Angle Cut
Executing the 75-degree angle cut on a miter saw requires proper technique and attention to detail. In this section, we will explain the proper technique for making the cut, provide step-by-step instructions for achieving a precise 75-degree angle cut, and include tips on maintaining control and avoiding common mistakes.
Proper technique for making the cut: The key to a successful 75-degree angle cut is a steady hand and precise control over the miter saw. Follow these steps for optimal results:
Step-by-step instructions for achieving a precise 75-degree angle cut: To execute a precise 75-degree angle cut on a miter saw, follow these steps:
- Ensure that the miter saw is properly set up, securely clamped, and the blade is adjusted to a 75-degree angle.
- Measure and mark the workpiece with the appropriate markings, indicating the start and end points of the cut.
- Align the marked line on the workpiece with the saw blade, ensuring that the workpiece is pressed firmly against the fence.
- Start the miter saw, allowing the blade to reach full speed before making contact with the workpiece.
- With a controlled and steady motion, guide the workpiece towards the blade, maintaining firm pressure against the fence.
- Keep your hands at a safe distance from the blade, using push sticks or other tools to maintain control.
- Allow the blade to complete the cut, maintaining a consistent cutting speed and avoiding any sudden movements.
- Once the cut is complete, let the blade come to a complete stop before removing the workpiece from the miter saw.
Tips on maintaining control and avoiding common mistakes:
- Keep a firm grip on the miter saw handles and maintain a stable stance throughout the cut.
- Use controlled and smooth movements, avoiding jerky or erratic motions.
- Do not force the workpiece through the cut; instead, let the blade do the work.
- Ensure that the workpiece is securely pressed against the fence to prevent any unwanted movement during the cut.
- Maintain a clear line of sight to the cutting area and avoid distractions.
- Double-check the accuracy of the angle setting and the alignment of the workpiece before making the cut.
- Take your time and proceed with caution, especially if you are new to cutting at a 75-degree angle.
By following the proper technique, step-by-step instructions, and implementing the provided tips, you can achieve precise and clean 75-degree angle cuts on a miter saw. In the next section, we will explore how to test and verify the accuracy of the cut.
Testing and Verifying the Accuracy of the Cut
After making a 75-degree angle cut on a miter saw, it is essential to assess the accuracy of the cut to ensure the desired precision. This section will describe how to assess the accuracy of the 75-degree angle cut, offer methods for verifying the precision of the cut using a protractor or measuring tools, and explain the significance of accurate cuts in achieving quality results.
Assessing the accuracy of the 75-degree angle cut: To evaluate the accuracy of the 75-degree angle cut, visually inspect the cut and check for any discrepancies or irregularities. Look for tight and seamless joints, precise mating surfaces, and uniformity in the angle of the cut. If the cut does not meet the desired accuracy, adjustments may be necessary.
Verifying the precision of the cut using a protractor or measuring tools: To verify the precision of the 75-degree angle cut, you can use the following methods:
- Protractor: Place a protractor or an angle measuring tool against the cut surface, aligning it with the angle line of the cut. The protractor should indicate a reading close to 75 degrees if the cut is accurate.
- Combination square: Use a combination square with an angle measuring feature to check the angle of the cut. Align one leg of the square with the reference edge of the workpiece and check if the other leg aligns with the angle line of the cut at approximately 75 degrees.
- Measuring tools: Measure the resulting angle using a digital angle finder or an electronic inclinometer. These tools provide precise measurements of angles, allowing you to verify the accuracy of the 75-degree angle cut.
Significance of accurate cuts in achieving quality results: Accurate cuts are crucial for achieving quality results in woodworking and construction projects. The significance of accurate 75-degree angle cuts lies in:
- Precise joints: Accurate cuts ensure tight and seamless joints, enhancing the overall strength and stability of the project.
- Consistency: Accurate cuts contribute to the consistency and uniformity of the workpiece, resulting in a professional and polished appearance.
- Fit and finish: Accurate cuts allow for precise mating surfaces, enabling proper assembly and a seamless fit between components.
- Time and material efficiency: Accurate cuts minimize wastage of materials and reduce the need for rework, saving time and resources.
By verifying the accuracy of the 75-degree angle cut and understanding the significance of precise cuts, you can ensure the quality and integrity of your woodworking or construction project. In the next section, we will discuss techniques for finishing and refining the cut.
Finishing and Refining the Cut
Once the 75-degree angle cut is made on a miter saw, it’s essential to refine the cut and achieve smooth edges for a professional finish. This section will discuss techniques for refining the cut, explain how to remove any burrs or imperfections resulting from the cut, and offer suggestions for sanding or further finishing the workpiece if necessary.
Techniques for refining the cut and achieving smooth edges: To refine the cut and achieve smooth edges, consider the following techniques:
- Use a fine-toothed file: Gently file the cut edges to remove any roughness or unevenness. Take care to maintain the angle of the cut while filing to preserve the accuracy of the 75-degree angle.
- Employ a block plane or chamfering tool: For woodworking projects, a block plane or chamfering tool can be used to create beveled or chamfered edges, enhancing the aesthetic appeal of the cut.
- Apply a sanding block: Use a sanding block with fine-grit sandpaper to smooth the cut edges. Sand in the direction of the grain to avoid splintering or damage to the workpiece.
Removing burrs or imperfections resulting from the cut: After making the cut, inspect the edges for any burrs, splinters, or imperfections. To remove them:
- Use a deburring tool: Gently run a deburring tool along the cut edges to remove any burrs or sharp edges.
- Sand the affected area: If there are imperfections or rough spots, sand the area lightly with fine-grit sandpaper until smooth.
Suggestions for sanding or further finishing the workpiece, if necessary: Depending on the project and desired outcome, additional sanding or finishing may be required:
- Sanding: If the cut surface requires further refinement, use progressively finer grit sandpaper to achieve a smooth and polished finish. Sand in the direction of the grain for optimal results.
- Staining or painting: If desired, apply wood stain or paint to the cut surface, following the manufacturer’s instructions. This step can enhance the appearance and protect the workpiece.
- Sealing or varnishing: For exposed or outdoor projects, consider applying a sealant or varnish to protect the cut surface from moisture and damage.
By implementing these techniques for refining the cut, removing imperfections, and considering additional sanding or finishing, you can achieve a professional and polished look for your 75-degree angle cut. In the concluding section, we will summarize the key points covered and encourage readers to apply their newfound knowledge.
Conclusion:
In this comprehensive guide, we explored the process of cutting a 75-degree angle on a miter saw. Here’s a summary of the key points covered:
Understanding the Basics of a Miter Saw:
- Miter saws are versatile tools used for precise angle cuts in woodworking and construction projects.
- Key components include the circular saw blade, blade guard, fence, miter gauge, bevel adjustment, positive stops, and laser guide.
Selecting the Right Blade and Setting Up the Miter Saw:
- Choosing the appropriate blade is crucial for accurate angle cuts.
- Use a high-tooth count, fine-toothed, carbide-tipped blade for cutting at a 75-degree angle.
- Properly set up the miter saw by ensuring its stability, blade alignment, and accurate angle adjustments.
Marking and Measuring for a 75 Degree Angle Cut:
- Precise marking and measuring are important for achieving accurate cuts.
- Mark the workpiece using an adjustable bevel square or protractor to indicate the 75-degree angle.
- Use high-quality measuring tools, measure on the correct side of the line, and double-check measurements for accuracy.
Adjusting the Miter Saw to a 75 Degree Angle:
- Adjust the miter saw by setting the blade to a 75-degree angle using the bevel adjustment feature.
- Take advantage of positive stops and detents specific to a 75-degree angle, if available.
- Troubleshoot issues like stuck adjustments or inaccurate angle readings.
Safety Precautions and Best Practices:
- Prioritize safety by wearing appropriate PPE, following the manufacturer’s instructions, and maintaining a clean and organized work area.
- Follow safety precautions such as securing the workpiece, using clamps, and disconnecting power when necessary.
Executing the 75 Degree Angle Cut:
- Utilize a steady hand and controlled movements to guide the workpiece through the cut.
- Maintain a firm grip on the miter saw handles, avoid sudden movements, and allow the blade to complete the cut before making any adjustments.
Testing and Verifying the Accuracy of the Cut:
- Assess the accuracy of the cut visually and inspect for tight joints and uniformity.
- Verify the precision using a protractor, combination square, or measuring tools for angle measurement.
Finishing and Refining the Cut:
- Refine the cut by using techniques like filing, chamfering, and sanding to achieve smooth edges.
- Remove burrs or imperfections using deburring tools and sanding.
- Consider additional sanding or finishing options like staining or sealing for desired aesthetics.
It is important to remember that cutting a 75-degree angle on a miter saw requires practice and patience. Mastery of this skill comes with experience, so don’t be discouraged if your initial results are not perfect. Embrace the learning process and focus on improving with each project.
I encourage you to apply the knowledge gained from this guide and experiment with different projects. As you tackle various woodworking and construction tasks, you will refine your skills in cutting precise 75-degree angles and achieve exceptional results.
Always prioritize safety, adhere to best practices, and continue to expand your woodworking expertise. With practice and dedication, you will become proficient in the art of cutting a 75-degree angle on a miter saw. Happy woodworking!