Knowing how to rip a 2×4 with a circular saw is an essential skill for any DIY enthusiast or woodworker. It empowers you to transform standard-sized lumber into narrower pieces, opening up a world of possibilities for various woodworking projects. In this article, we will explore the step-by-step process of ripping a 2×4 with a circular saw and delve into the reasons why a circular saw is the preferred tool for this task.
Benefits of Using a Circular Saw: Using a circular saw for ripping offers several advantages. Firstly, circular saws are portable and versatile, allowing you to work on your projects in different locations with ease. Additionally, circular saws are designed to make straight cuts, ensuring precision and accuracy when ripping the 2×4. They also offer adjustable cutting depths and bevel angles, providing flexibility to meet your specific project requirements. By mastering this skill, you will enhance your woodworking capabilities and achieve professional-looking results.
Common Scenario: Imagine you want to build a wooden shelf for your home, but the dimensions of the available lumber at the store don’t precisely match your requirements. By knowing how to rip a 2×4 with a circular saw, you can easily customize the lumber to fit your needs. Whether it’s adjusting the width of a tabletop, creating thinner slats for a fence, or making precise cuts for cabinetry, the ability to rip a 2×4 with a circular saw opens up a world of creative possibilities, allowing you to tackle a wide range of woodworking projects with confidence and precision.
Understanding the Basics
Ripping a 2×4 refers to the process of cutting a piece of standard-sized lumber, typically measuring 2 inches by 4 inches, along its length to create narrower strips. This technique allows you to obtain customized sizes of wood that better suit your project needs.
The purpose of ripping is different from cross-cutting, which involves cutting wood across its width. While cross-cutting creates shorter pieces, ripping focuses on producing narrower strips from longer boards. Understanding this distinction is crucial as it determines the orientation and direction of the cut you need to make.
Before you begin the process of ripping a 2×4 with a circular saw, it’s essential to prioritize safety precautions. Woodworking tools, including circular saws, can be hazardous if not handled properly. Ensure you have a well-ventilated and well-lit workspace. Wear appropriate safety gear, such as safety goggles, hearing protection, and gloves, to protect yourself from flying debris and potential accidents.
Take the time to familiarize yourself with the circular saw’s features, including the blade guard, depth adjustment, and safety lock. Ensure that the blade is sharp and properly aligned before starting. It’s also advisable to have a first aid kit nearby in case of any minor injuries. By taking these safety precautions, you can significantly reduce the risk of accidents and work more confidently.
Choosing the Right Circular Saw
When it comes to selecting a circular saw for ripping tasks, it’s essential to consider various factors to ensure optimal performance and safety. Here are some key aspects to keep in mind:
Types of Circular Saws:
- Sidewinder Circular Saw: Also known as an inline or direct-drive circular saw, this type features a motor that is aligned with the blade, making it lightweight and maneuverable.
- Worm Drive Circular Saw: With the motor positioned behind the blade, worm drive saws offer more torque and are commonly used for heavy-duty applications.
- Hypoid Circular Saw: Similar to worm drive saws, hypoid saws have a motor positioned behind the blade, providing high power and improved efficiency.
Considerations for Ripping Tasks:
- Power: Look for a circular saw with sufficient power to handle ripping through 2x4s effectively. Higher amperage or voltage ratings often indicate greater cutting power.
- Blade Size: Circular saws typically come in blade sizes ranging from 6 to 10 inches. For ripping 2x4s, a blade size of 7 1/4 inches is commonly recommended.
- Cutting Depth and Bevel Capacity: Ensure the circular saw has an adjustable cutting depth that allows you to cut through the full thickness of the 2×4. A bevel capacity feature is also useful for making angled cuts.
- Research and Studies: While specific studies or statistics regarding circular saw models for ripping 2x4s may not be available, it’s advisable to consult reputable woodworking magazines, websites, or customer reviews. These sources often provide valuable insights and comparisons based on users’ experiences and expert opinions.
- Brand and Quality: Opting for well-known and reputable brands can provide assurance of product quality, durability, and performance. Researching customer feedback and ratings can give you an idea of the reliability and satisfaction levels associated with different brands.
Remember, the circular saw you choose should align with your specific ripping needs, ensuring safety, precision, and efficiency throughout your woodworking projects.
Gathering the Necessary Tools and Materials
Before you embark on ripping a 2×4 with a circular saw, it’s important to gather the following tools and materials to ensure a smooth and successful process:
Tools:
- Circular Saw: Choose a suitable circular saw based on the considerations mentioned earlier in the article.
- Tape Measure: Use a tape measure to accurately measure and mark the desired dimensions for ripping the 2×4.
- Pencil or Marking Tool: Mark the cutting line on the 2×4 for guidance during the ripping process.
- Clamps: Secure the 2×4 firmly to prevent movement during the cut.
- Speed Square or Combination Square: These tools can help ensure accurate and square cuts.
- Push Stick: Use a push stick to maintain a safe distance between your hands and the saw blade while guiding the wood through the cut.
- Sawhorses or Workbench: Provide a stable and elevated surface to support the 2×4 during the ripping process.
- Dust Collection System or Shop Vacuum: Helps keep your workspace clean and free of sawdust, improving visibility and air quality.
Materials:
- 2×4 Lumber: Choose a suitable length and type of 2×4 lumber based on your project requirements.
- Screws or Nails (optional): If you plan to attach the ripped pieces to other elements of your project, have the appropriate fasteners ready.
Safety Equipment:
- Safety Goggles: Protect your eyes from flying debris and sawdust.
- Gloves: Wear gloves to provide a better grip and protect your hands.
- Hearing Protection: Circular saws can be loud, so use earmuffs or earplugs to protect your hearing.
Recommended Accessories or Attachments:
- Rip Fence: A rip fence helps guide the wood through the cut and ensures a straight and consistent rip. Some circular saws have built-in rip guides or compatible accessories.
- Circular Saw Blade: Consider using a rip-cutting or combination blade specifically designed for clean and efficient ripping.
By gathering these tools, materials, safety equipment, and optional accessories, you’ll be well-prepared to proceed with the ripping process while prioritizing safety and accuracy.
Setting Up the Work Area
To ensure a safe and efficient ripping process when using a circular saw, it’s crucial to prepare a suitable work area. Here are key considerations for setting up your workspace:
- Importance of a Suitable Work Area: A well-prepared work area minimizes the risk of accidents and allows for better control and accuracy during the ripping process. It provides a dedicated space where you can focus on the task at hand without distractions.
- Stable Work Surface: Choose a stable work surface, such as sawhorses or a workbench, to support the 2×4 during the ripping process. Stability is essential for preventing the wood from moving or vibrating while cutting, ensuring clean and precise cuts.
- Proper Lighting: Adequate lighting is crucial to maintain visibility and ensure accurate cuts. Position work lights or utilize natural lighting sources to illuminate the work area, particularly the cutting line on the 2×4. This helps prevent mistakes and promotes safer working conditions.
- Securing the 2×4: To prevent the 2×4 from shifting during the cut, use clamps to secure it firmly to the work surface. Ensure the clamps are placed away from the path of the circular saw blade to avoid interference. The secured 2×4 provides stability and allows you to focus on guiding the circular saw accurately.
- Proper Support: Longer 2x4s may extend beyond the work surface, creating potential instability. To address this, use additional supports such as scrap wood or sawhorses to provide adequate support along the length of the 2×4. This prevents sagging or tilting, ensuring a straight and consistent cut.
- Clear Work Area: Clear away any debris, tools, or obstructions from the work area. A clutter-free workspace minimizes tripping hazards and allows you to move freely and safely while operating the circular saw.
Remember, a well-prepared work area sets the foundation for a successful ripping process. By ensuring a stable work surface, proper lighting, and secure support for the 2×4, you can enhance safety, accuracy, and overall woodworking experience.
Adjusting the Circular Saw
Properly adjusting the circular saw is essential for achieving accurate and smooth rips when working with a 2×4. Follow these steps to adjust the depth and bevel settings and align the saw blade with the intended cutting line:
Adjusting the Depth:
- Loosen the depth adjustment lever or knob on the circular saw.
- Determine the desired depth of the cut, considering the thickness of the 2×4.
- Align the depth indicator on the saw base with the desired depth measurement.
- Tighten the depth adjustment lever or knob to secure the set depth.
Setting the Bevel (if necessary):
- If you need to make a bevel cut rather than a straight rip, loosen the bevel adjustment lever or knob.
- Tilt the base of the saw to the desired bevel angle, typically 0 degrees for a straight rip.
- Align the bevel angle indicator on the saw base with the desired angle measurement.
- Tighten the bevel adjustment lever or knob to secure the set bevel angle.
Aligning the Saw Blade:
- Before making any cuts, visually identify the cutting line marked on the 2×4.
- Adjust the position of the circular saw’s base so that the saw blade aligns with the cutting line.
- Some circular saws have built-in guides or lasers that assist in aligning the blade with the intended cut.
- Take your time to ensure the blade is parallel to the cutting line for an accurate and precise rip.
Tips for Alignment:
- Use a speed square or combination square to verify that the blade is perpendicular to the surface of the 2×4.
- Consider making a small test cut on scrap wood to confirm the alignment before proceeding with the actual rip.
- Maintain a steady grip on the circular saw and position yourself comfortably to have a clear view of the cutting line.
- Take your time and proceed with controlled movements to maintain accuracy and achieve a smooth rip.
By properly adjusting the depth and bevel settings, and ensuring the alignment of the saw blade with the cutting line, you’ll be ready to execute accurate and smooth rips on the 2×4 with your circular saw.
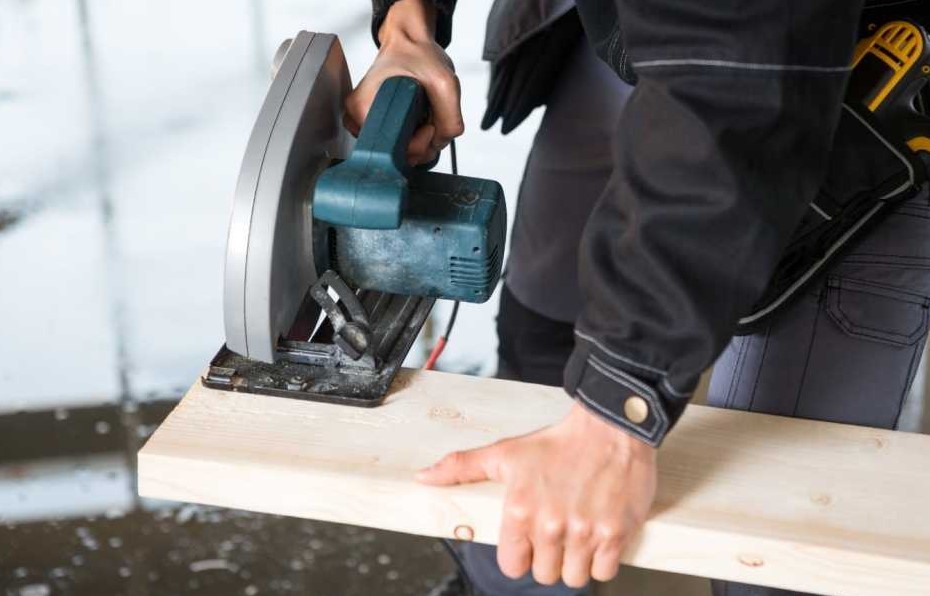
Executing the Rip
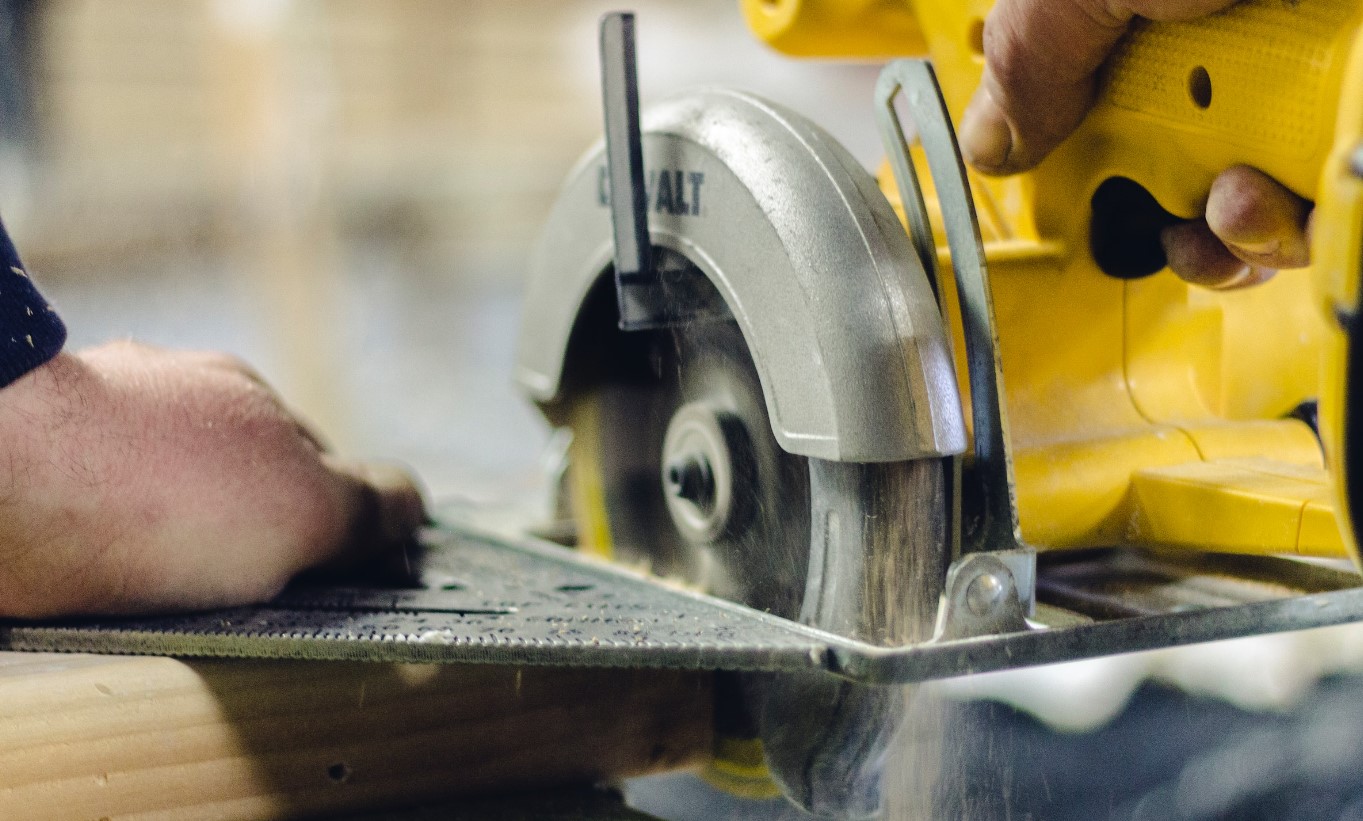
Once you have prepared your work area and adjusted your circular saw, it’s time to execute the rip on the 2×4. Follow these step-by-step guidelines for a successful rip using a circular saw:
Positioning and Hand Placement:
- Stand in a comfortable and stable position with your feet shoulder-width apart.
- Hold the circular saw with both hands, maintaining a firm grip on the handles.
- Position your dominant hand on the rear handle and your non-dominant hand on the front handle.
- Keep your body to the side of the saw, ensuring that you are not directly in line with the blade.
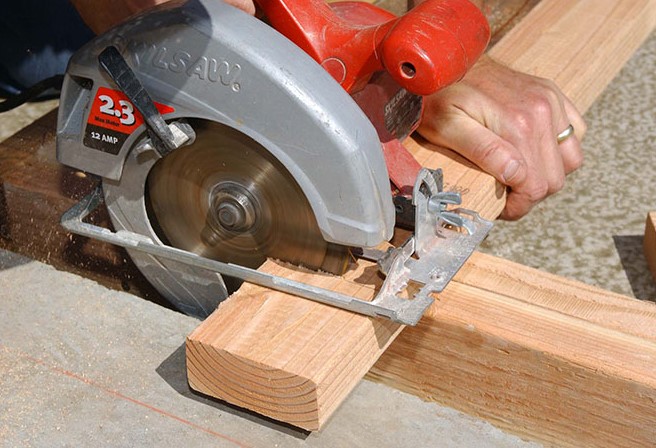
Beginning the Cut:
- Align the blade with the cutting line on the 2×4, ensuring the blade is parallel to the line.
- Start the circular saw and allow the blade to reach full speed before making contact with the wood.
- Slowly lower the spinning blade onto the wood, keeping a steady and controlled motion.
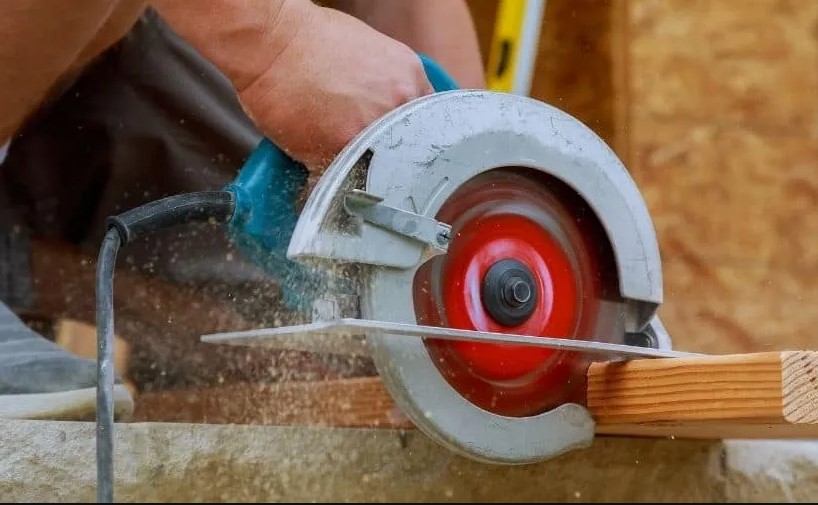
Guiding the Saw:
- With your eyes on the cutting line, guide the saw steadily along the marked path.
- Maintain a firm grip on the handles and apply even pressure as you move the saw forward.
- Let the saw do the cutting; avoid pushing or forcing it through the wood.
- Keep the saw moving at a consistent pace to achieve a smooth and uniform rip.
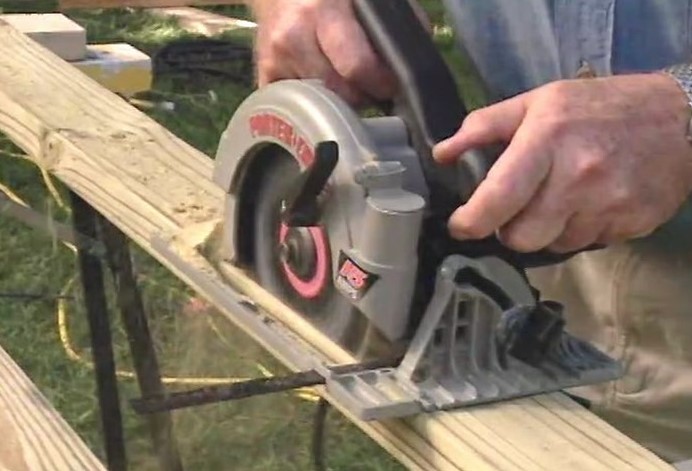
Complete the Rip:
- Continue cutting along the marked line until you reach the end of the 2×4.
- Once you approach the end of the cut, ensure that the wood is adequately supported to prevent splintering or tearing.
- Slowly lift the spinning blade out of the wood once you have completed the rip.
- Allow the blade to come to a complete stop before setting the circular saw aside.
Safety and Clean-up:
- After completing the rip, ensure the circular saw is switched off and unplugged.
- Set the saw aside on a stable surface, away from the reach of children or others.
- Remove any cut pieces and debris from the work area.
- Check the quality of the rip, making any necessary adjustments or finishing touches.
Maintaining a Steady Pace: It’s important to maintain a steady cutting pace throughout the rip. Rushing or applying excessive force can lead to inaccurate cuts or even accidents. By maintaining a controlled and consistent cutting pace, you’ll achieve smoother results and reduce the risk of errors.
Remember, safety should always be a priority when working with power tools. Stay focused, maintain proper body positioning and hand placement, and proceed with patience and caution. By following these guidelines, you’ll be able to execute precise and smooth rips on your 2×4 using a circular saw.
Safety Measures

Safety should always be a top priority when working with power tools like circular saws. Here are important safety measures to reinforce during the ripping process:
Safety Throughout the Ripping Process:
- Wear appropriate safety equipment, including safety goggles, gloves, and hearing protection.
- Avoid loose clothing, jewelry, or anything that could get caught in the saw.
- Ensure that the work area is well-ventilated and free from clutter.
- Keep bystanders, especially children and pets, at a safe distance from the work area.
- Do not operate the circular saw under the influence of drugs or alcohol.
Using a Push Stick:
- When the cut is near the end of the 2×4, use a push stick to maintain a safe distance between your hands and the saw blade.
- A push stick allows you to guide the wood through the cut while keeping your hands away from the blade, minimizing the risk of accidents.
Maintaining Focus:
- Stay focused and avoid distractions while operating the circular saw.
- Concentrate on the cutting line and the positioning of the saw to ensure accuracy and safety.
- Take breaks if needed to prevent fatigue or loss of concentration.
Relevant Statistics and Studies: Although specific statistics related to accidents or injuries during circular saw usage for ripping 2x4s might not be readily available, it’s important to be aware of common risks and take appropriate precautions. Studies have shown that most injuries occur due to lack of proper safety measures, including failure to wear protective equipment, insufficient training, or rushing through the cutting process. It’s essential to prioritize safety protocols to minimize the risk of accidents and ensure a safe working environment.
Remember, the goal is to complete your woodworking project safely and efficiently. By reinforcing safety measures, using a push stick, maintaining focus, and being aware of potential risks, you can greatly reduce the likelihood of accidents and injuries while working with a circular saw.
Finishing Touches and Cleanup
Once you have successfully completed the rip on the 2×4, there are a few important steps to take for achieving a clean and smooth result, as well as ensuring a safe and tidy work area. Follow these guidelines:
Achieving a Clean and Smooth Rip:
- Inspect the cut to ensure it meets your desired specifications and is free from any significant imperfections.
- If necessary, use sandpaper or a wood file to smooth out any rough edges or splinters along the ripped edge.
- Take your time to achieve a clean and polished finish, especially if the ripped edge will be visible in your project.
Removing Rough Edges or Splinters:
- Gently run sandpaper or a wood file along the ripped edge to remove any roughness or splinters.
- Start with a coarse-grit sandpaper to smooth out any prominent imperfections, then progress to a finer-grit sandpaper for a smoother finish.
- Pay extra attention to corners or areas where splinters may be more likely to occur.
Proper Cleanup Procedures:
- Clear the work area of any debris, including sawdust, wood scraps, or unused materials.
- Use a broom, vacuum, or dust collection system to remove sawdust from the work surface and surrounding area.
- Dispose of any waste materials in appropriate containers or recycling bins.
- Store your tools, including the circular saw, in a safe and organized manner to prevent accidents and maintain their longevity.
By taking the time to achieve a clean and smooth rip and removing any rough edges or splinters, you ensure the final piece of wood is ready for use in your project. Additionally, maintaining a clean and organized work area promotes safety and improves overall efficiency during your woodworking endeavors.
Maintenance and Care for Circular Saws
To ensure the performance, longevity, and safe operation of your circular saw, regular maintenance and care are crucial. Here are some tips to help you maintain your circular saw effectively:
Cleaning and Lubrication:
- Regularly clean your circular saw after each use to remove sawdust, debris, and buildup. Use a brush or compressed air to clean the blade guard, base, and other accessible parts.
- Pay attention to the air vents and ensure they are clear of dust to prevent overheating.
- Lubricate any moving parts, such as the blade arbor, according to the manufacturer’s recommendations. Use a lubricant specifically designed for power tools.
Blade Maintenance:
- Inspect the saw blade regularly for any signs of damage, dullness, or buildup. Replace or sharpen the blade as needed to ensure optimal cutting performance.
- Follow the manufacturer’s instructions for blade replacement and use compatible blades designed for your circular saw model and intended applications.
- Keep the blade clean and free from pitch or resin buildup. Use an appropriate blade cleaner or a mild solvent to remove any residues.
Check and Adjust Settings:
- Periodically check and calibrate the cutting depth and bevel angle settings to ensure accuracy. Refer to the manufacturer’s instructions for specific adjustment procedures.
- Verify that all safety features, such as the blade guard and safety lock, are functioning correctly.
Storage and Transport:
- Store your circular saw in a clean, dry, and secure location, preferably in a case or dedicated storage area to protect it from dust, moisture, and potential damage.
- If transporting the circular saw, secure it properly to prevent any accidental movement or damage.
Manufacturer Recommendations:
- Consult the user manual or the manufacturer’s website for specific maintenance guidelines and recommendations for your circular saw model.
- Some manufacturers may provide instructions for specific lubricants, cleaning agents, or replacement parts to ensure optimal performance and warranty coverage.
By following these maintenance tips and adhering to the manufacturer’s recommendations, you can extend the life of your circular saw, maintain its performance, and ensure safe and accurate cuts throughout your woodworking projects. Regular care and maintenance not only improve the longevity of the tool but also contribute to your overall safety and satisfaction as a woodworker.
Conclusion:
In this comprehensive guide, we have covered essential information on how to rip a 2×4 with a circular saw. Let’s recap the key points discussed:
Understanding the Basics:
- Ripping involves cutting a 2×4 along its length to create narrower strips.
- Ripping differs from cross-cutting, which involves cutting across the width of the wood.
Choosing the Right Circular Saw:
- Consider the different types of circular saws available and their features.
- Research reputable brands and seek customer feedback to make an informed choice.
Gathering the Necessary Tools and Materials:
- Create a checklist of tools and safety equipment, including goggles, gloves, and clamps.
- Consider additional accessories like rip fences to enhance the ripping process.
Setting Up the Work Area:
- Prepare a stable work surface with proper lighting and support for the 2×4.
- Secure the wood with clamps to prevent movement during the cut.
Adjusting the Circular Saw:
- Adjust the depth and bevel settings on the circular saw according to your project needs.
- Align the saw blade with the intended cutting line for accuracy.
Executing the Rip:
- Follow proper body positioning and hand placement for optimal control.
- Maintain a steady cutting pace and avoid rushing the process.
Safety Measures:
- Emphasize the importance of safety throughout the ripping process.
- Use a push stick, maintain focus, and be aware of potential risks.
Finishing Touches and Cleanup:
- Achieve a clean and smooth rip by removing rough edges and splinters.
- Follow proper cleanup procedures to maintain a safe work area.
Maintenance and Care for Circular Saws:
- Regularly clean, lubricate, and inspect your circular saw for optimal performance.
- Adhere to manufacturer recommendations for blade maintenance and storage.
In conclusion, mastering the skill of ripping 2x4s with a circular saw opens up endless possibilities for woodworking projects. Encourage readers to practice and refine their skills, as continuous learning is key to improvement. Always prioritize safety by following safety measures and investing in proper equipment. Remember to stay updated with manufacturer guidelines and embrace a mindset of continuous improvement in woodworking.
Happy ripping and enjoy your woodworking journey!