Vinyl flooring has become increasingly popular as a versatile and cost-effective option for both residential and commercial spaces. Whether you’re considering a DIY flooring project or a professional installation, the precise cutting of vinyl flooring is crucial for achieving a seamless and professional-looking finish. In this article, we will explore the topic of cutting vinyl flooring and specifically focus on the relevance of using a table saw as a valuable tool in this process.
Cutting vinyl flooring accurately is essential for ensuring a smooth installation and minimizing wastage. A table saw, with its straight and precise cuts, can greatly assist in achieving this goal. While there are alternative cutting methods available, the use of a table saw offers several advantages, including efficiency, speed, and the ability to produce clean and consistent cuts.
By understanding the importance of using a table saw for cutting vinyl flooring, you can enhance your flooring project’s overall quality and save time and effort in the process. In the following sections, we will delve deeper into the characteristics of vinyl flooring, discuss safety precautions, provide step-by-step instructions, explore alternative cutting methods, and highlight common mistakes to avoid. So, let’s dive in and discover the best practices for cutting vinyl flooring with a table saw.
Understanding Vinyl Flooring and Its Characteristics

Vinyl flooring is a synthetic flooring material that is composed of multiple layers. The topmost layer, known as the wear layer, provides durability and resistance to scratches and stains. Beneath the wear layer, there is a printed design layer that mimics the appearance of various materials such as wood, tile, or stone. This layer gives vinyl flooring its aesthetic appeal. Additional layers include the core layer, which provides stability and moisture resistance, and the backing layer that adds further support and insulation.
There are different types of vinyl flooring available in the market, including luxury vinyl tile (LVT), luxury vinyl plank (LVP), and sheet vinyl. LVT and LVP are individual tiles or planks that can be installed with adhesive or as a floating floor. Sheet vinyl, on the other hand, comes in large rolls and is typically glued down to the subfloor.
Vinyl flooring offers several advantages over other flooring materials. Firstly, it is highly resilient, meaning it can withstand heavy foot traffic and resist dents and scratches. This durability makes vinyl flooring an excellent choice for high-traffic areas such as kitchens and hallways. Additionally, vinyl flooring is moisture-resistant, making it suitable for areas prone to spills or moisture, such as bathrooms and basements.
Relevant statistics and studies highlight the growing popularity of vinyl flooring. According to a report by Grand View Research, the global vinyl flooring market size was valued at $25.6 billion in 2020 and is expected to witness a compound annual growth rate (CAGR) of 7.3% from 2021 to 2028. The report attributes this growth to the increasing demand for aesthetically pleasing, low-maintenance, and cost-effective flooring options in residential and commercial spaces.
Vinyl flooring’s popularity can be attributed to its versatility, affordability, and wide range of design options. With advancements in manufacturing techniques, vinyl flooring can now accurately mimic the look and texture of natural materials while offering enhanced durability and ease of maintenance.
Understanding the composition, types, and advantages of vinyl flooring sets the foundation for making informed decisions when it comes to cutting and installing this versatile flooring material. In the following sections, we will explore the proper cutting techniques, safety precautions, and best practices to ensure successful vinyl flooring installations.
The Importance of Proper Cutting Techniques
Accurate and clean cuts are paramount when it comes to cutting vinyl flooring. The precision of the cuts directly impacts the installation process and the final outcome of the flooring project. Here are some reasons why proper cutting techniques are essential:
Emphasizing the significance of accurate and clean cuts: Accurate cuts ensure that the vinyl flooring pieces fit together seamlessly, creating a uniform and professional appearance. Clean cuts contribute to the overall aesthetics of the installation, leaving smooth edges that enhance the visual appeal of the flooring.
Improper cutting can affect the installation process: When cuts are not precise, it can lead to gaps between the flooring pieces or overlapping, resulting in an uneven and unappealing floor. This can make the installation process challenging and time-consuming, as adjustments and modifications may be required to rectify the mistakes.
Potential issues caused by uneven cuts or jagged edges: Uneven cuts or jagged edges can compromise the integrity of the flooring and create potential tripping hazards. Furthermore, these imperfections may accumulate dirt and debris over time, making it harder to clean and maintain the flooring’s hygiene.
Proper cutting techniques are essential for a successful vinyl flooring installation. They ensure a seamless and visually appealing outcome while minimizing installation issues and potential hazards. In the following sections, we will explore safety precautions, step-by-step instructions, and best practices for cutting vinyl flooring with a table saw to help you achieve accurate and clean cuts for your project.
Safety Precautions Before Cutting Vinyl Flooring
Before you begin cutting vinyl flooring with a table saw, it is crucial to prioritize safety. By taking the necessary precautions and following safety guidelines, you can minimize the risk of accidents and ensure a safe working environment. Here are some key safety measures to consider:
Provide a checklist of safety equipment needed: Before operating a table saw to cut vinyl flooring, ensure you have the following safety equipment:
- Safety goggles or glasses: Protect your eyes from any debris or particles that may be generated during the cutting process.
- Ear protection: Reduce the noise levels produced by the table saw, especially if it is a loud model.
- Dust mask or respirator: Prevent inhalation of dust or fumes generated by cutting vinyl flooring.
- Work gloves: Provide grip and protect your hands when handling the flooring material or operating the table saw.
- Push sticks or blocks: Use these tools to safely guide the vinyl flooring through the table saw while keeping your hands at a safe distance from the blade.
Explain the importance of wearing protective gear: Wearing protective gear is essential to safeguard yourself from potential hazards. Safety goggles or glasses shield your eyes from flying debris or wood chips, preventing eye injuries. Ear protection helps minimize the risk of hearing damage caused by prolonged exposure to the loud noise produced by the table saw. A dust mask or respirator protects your respiratory system from inhaling fine dust particles or harmful fumes that may be released during cutting.
Describe the proper setup and handling of a table saw: To ensure safe operation of a table saw when cutting vinyl flooring, follow these guidelines:
- Read and familiarize yourself with the manufacturer’s instructions and safety guidelines provided in the table saw’s manual.
- Set up the table saw on a stable and level surface, ensuring it is securely anchored or clamped down to prevent movement during operation.
- Adjust the blade height to slightly higher than the thickness of the vinyl flooring to avoid excessive friction and reduce the risk of kickback.
- Use the appropriate blade suitable for cutting vinyl flooring, such as a fine-toothed blade designed for clean and precise cuts.
- Maintain a clear and organized workspace, removing any clutter or obstructions that may interfere with the cutting process.
- When feeding the vinyl flooring into the table saw, use push sticks or blocks to keep your hands a safe distance away from the blade, ensuring smooth and controlled movement.
By adhering to these safety precautions, wearing the necessary protective gear, and following proper setup and handling procedures, you can significantly reduce the risk of accidents and injuries when cutting vinyl flooring with a table saw.
Preparing the Vinyl Flooring for Cutting
Before you begin cutting vinyl flooring with a table saw, it is important to properly prepare the flooring to ensure accurate and clean cuts. Follow these steps to effectively prepare the vinyl flooring:
Outline the necessary steps for preparing the flooring before cutting:
- Measure and assess: Start by measuring the area where the vinyl flooring will be installed. Take accurate measurements to determine the dimensions of the flooring pieces you need to cut.
- Clean the flooring: Thoroughly clean the surface of the vinyl flooring to remove any dirt, debris, or moisture that may affect the cutting process or the quality of the cuts.
- Acclimate the flooring: If the vinyl flooring has been stored in a different environment, allow it to acclimate to the room’s temperature and humidity for a sufficient amount of time. This helps prevent any expansion or contraction of the material after installation.
- Plan the layout: Consider the layout of the room and the positioning of the vinyl flooring pieces. Plan the cuts accordingly to minimize wastage and achieve a visually appealing arrangement.
Discuss how to measure and mark the vinyl flooring accurately:
- Use a measuring tape or ruler to measure the dimensions of the area where the vinyl flooring will be placed. Take accurate measurements and account for any obstructions or irregularities in the space.
- Transfer the measurements onto the vinyl flooring using a pencil or a marker. Mark the cutting lines clearly and precisely to guide your cuts on the table saw.
- Double-check your measurements and marks to ensure accuracy before proceeding with cutting.
Provide tips on ensuring the vinyl flooring is securely positioned for cutting:
- Use clamps or weights: If working with smaller vinyl flooring pieces, secure them in place with clamps or weights to prevent shifting or movement during the cutting process. This ensures clean and accurate cuts.
- Support the flooring: For larger vinyl flooring pieces, have an additional person help support the material on both ends while feeding it into the table saw. This helps maintain stability and prevents sagging or buckling during the cutting process.
- Use a sacrificial backing: If necessary, place a sacrificial backing, such as a scrap piece of plywood, under the vinyl flooring to provide additional support and prevent tear-out or chipping on the bottom side of the cut.
By following these steps and tips, you can effectively prepare the vinyl flooring for cutting, ensuring accurate measurements, clear markings, and a secure position for clean and precise cuts.
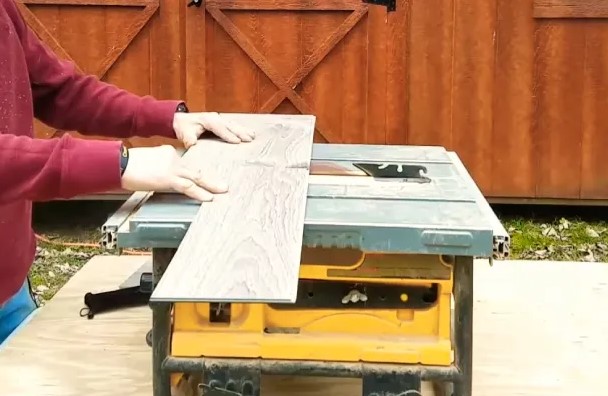
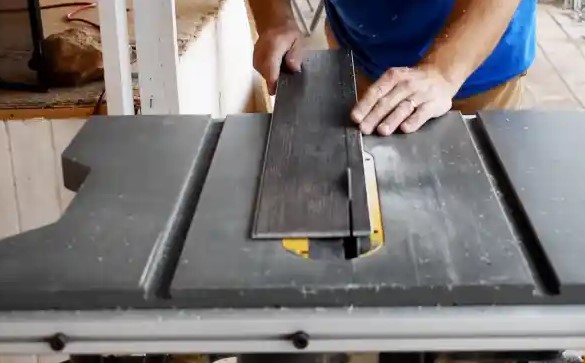
Cutting Vinyl Flooring with a Table Saw
When it comes to cutting vinyl flooring, a table saw is a versatile and effective tool that can help you achieve precise and straight cuts. Here, we will introduce the concept of using a table saw for cutting vinyl flooring, explain its suitability for straight cuts, and provide step-by-step instructions for the cutting process.
Introduce the concept of using a table saw for cutting vinyl flooring: A table saw is a stationary power tool consisting of a circular saw blade mounted on an arbor and driven by an electric motor. It offers a flat and stable surface, along with an adjustable fence, allowing for accurate and repeatable cuts. While there are alternative cutting methods available, a table saw is particularly suitable for making straight cuts in vinyl flooring.
Explain the suitability of a table saw for straight cuts: Vinyl flooring typically requires straight cuts to ensure precise fitting and a seamless installation. A table saw excels in making straight cuts due to its stationary nature and the use of a rip fence or miter gauge for guiding the material. The adjustable fence provides a consistent reference point, allowing for consistent and parallel cuts.
Provide step-by-step instructions for cutting vinyl flooring using a table saw:
- Ensure that you have set up the table saw correctly, following the manufacturer’s instructions and safety guidelines.
- Put on the necessary protective gear, including safety goggles or glasses, ear protection, and work gloves.
- Place the vinyl flooring piece on the table saw, aligning the marked cutting line with the rip fence or miter gauge.
- Adjust the blade height to slightly higher than the thickness of the vinyl flooring.
- Turn on the table saw and wait for the blade to reach full speed before making the cut.
- Push the vinyl flooring piece steadily and smoothly through the blade, using push sticks or blocks to maintain a safe distance from the blade and ensure a controlled feed.
- Once the cut is complete, turn off the table saw and wait for the blade to come to a complete stop before removing the cut piece.
- Inspect the cut for accuracy and smoothness. Make any necessary adjustments to the table saw or cutting technique for subsequent cuts.
- Repeat the process for each vinyl flooring piece that requires cutting, following the marked cutting lines and maintaining safety precautions throughout.
By using a table saw and following these step-by-step instructions, you can achieve precise and clean cuts in your vinyl flooring, ensuring a smooth and professional installation. Remember to prioritize safety at all times and make sure to handle the table saw with caution.
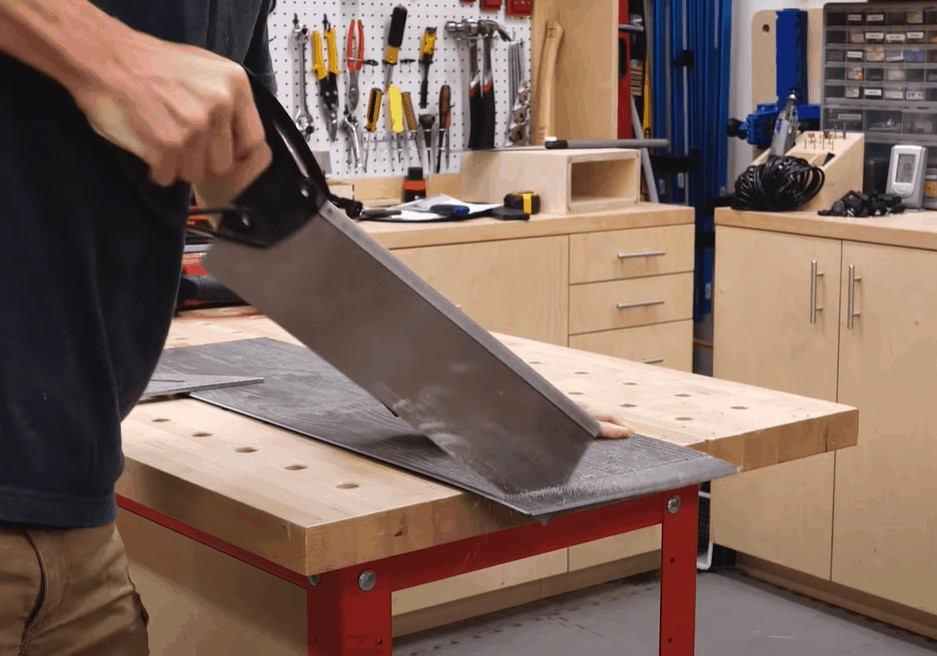
Alternative Cutting Methods for Vinyl Flooring

While using a table saw is a popular choice for cutting vinyl flooring, there are alternative tools and methods available that may be suitable depending on the specific circumstances of your project. In this section, we will explore some of these alternatives, discuss their advantages and limitations, and highlight scenarios where they may be preferred.
- Utility Knife: A utility knife with a sharp, retractable blade can be used to make straight cuts in vinyl flooring. It is a convenient and portable option for smaller cuts or intricate shapes. However, it may not provide the same level of precision and efficiency as a table saw, especially for longer or wider cuts.
Advantages: Portable, suitable for smaller cuts, inexpensive. Limitations: Less precise, slower for longer cuts.
- Score-and-Snap Method: This method involves scoring the vinyl flooring with a utility knife or a special scoring tool and then snapping it along the scored line. It is commonly used with sheet vinyl flooring. While it may not produce as clean and precise cuts as a table saw, it can be effective for straight cuts in larger vinyl sheets.
Advantages: Suitable for sheet vinyl flooring, minimal tools required. Limitations: Less precise, limited to straight cuts.
- Jigsaw: A jigsaw equipped with a fine-toothed blade can be used to cut curves, irregular shapes, or intricate designs in vinyl flooring. It allows for greater flexibility and maneuverability compared to a table saw. However, it may be slower and may not provide the same level of precision for straight cuts.
Advantages: Suitable for curves and intricate shapes, versatile. Limitations: Slower for straight cuts, may produce rougher edges.
- Vinyl Cutter: A vinyl cutter, also known as a vinyl plank cutter or a guillotine cutter, is a specialized tool designed specifically for cutting vinyl flooring. It features a sharp blade and a built-in guide for making straight cuts. Vinyl cutters are particularly useful for cutting luxury vinyl tiles or planks.
Advantages: Precise cuts, easy to use, suitable for luxury vinyl tiles/planks. Limitations: Limited to straight cuts, may not be ideal for larger vinyl sheets.
The choice of alternative cutting methods will depend on factors such as the nature of the cuts required, the size of the vinyl flooring pieces, and the tools available. While a table saw offers efficient and precise straight cuts, alternative methods can be viable options for specific scenarios where portability, maneuverability, or specialized cuts are required.
It’s important to assess the needs of your project and select the most appropriate cutting method accordingly. Always follow safety guidelines and use the necessary protective gear when using any cutting tools.
Common Mistakes to Avoid
When cutting vinyl flooring, it’s crucial to be aware of common mistakes that can compromise the quality of the cuts and the overall flooring installation. By understanding these mistakes and implementing preventive measures, you can ensure a successful and professional-looking result. Here are some common mistakes to avoid:
- Inaccurate measurements: Failing to take precise measurements or inaccurately marking the cutting lines can result in ill-fitting or misaligned vinyl flooring pieces. This can lead to gaps, uneven seams, or overlapping, affecting the overall appearance and integrity of the installation.
Preventive measures: Double-check measurements before cutting, use a measuring tape or ruler for accuracy, and mark the cutting lines clearly and precisely. Take your time to ensure proper alignment and adherence to the marked lines.
- Improper blade selection: Using the wrong type of blade or a dull blade can result in rough and uneven cuts, causing jagged edges or tear-outs. This not only affects the aesthetics but also makes it challenging to achieve a seamless installation.
Preventive measures: Choose a blade specifically designed for cutting vinyl flooring. Opt for a fine-toothed blade that provides clean and smooth cuts. Ensure the blade is sharp and in good condition to minimize tearing or splintering.
- Lack of proper support: Insufficient support for the vinyl flooring while cutting can lead to vibrations, sagging, or bending. This can result in uneven cuts or errors in the dimensions of the flooring pieces.
Preventive measures: Ensure the vinyl flooring is adequately supported during the cutting process. Use clamps, weights, or an extra pair of hands to keep the material stable and prevent movement or flexing.
- Rushing the cutting process: Cutting vinyl flooring requires patience and attention to detail. Rushing through the cutting process can lead to imprecise cuts, uneven edges, or mistakes that require time-consuming corrections.
Preventive measures: Take your time when cutting vinyl flooring. Follow a steady and controlled feeding motion, ensuring the material is guided smoothly through the blade. Avoid rushing or forcing the cuts, as this can result in errors or compromised quality.
- Neglecting safety precautions: Failing to prioritize safety can lead to accidents, injuries, or damage to the flooring material. This includes not wearing appropriate protective gear, not following safety guidelines, or disregarding proper handling of cutting tools.
Preventive measures: Always wear safety goggles or glasses, ear protection, and work gloves when cutting vinyl flooring. Follow the safety instructions provided by the manufacturer for the table saw or any other cutting tools used. Practice proper handling and ensure the workspace is clean and free from potential hazards.
The potential consequences of these mistakes can include a visually unappealing flooring installation, compromised durability, and difficulties in joining the flooring pieces smoothly. It is essential to take the time to avoid these common mistakes, follow best practices, and prioritize accuracy and safety when cutting vinyl flooring.
By being mindful of these mistakes and implementing the preventive measures suggested, you can achieve clean, precise cuts, and ensure a successful vinyl flooring installation.
Finishing and Post-Cutting Considerations
After cutting vinyl flooring, it is important to give attention to the finishing of the cut edges and consider post-cutting maintenance and cleaning requirements. These steps ensure a polished and professional-looking result while prolonging the longevity of the flooring. Here’s what you need to know:
Discuss the importance of finishing the cut edges of vinyl flooring: Finishing the cut edges of vinyl flooring is essential for several reasons. Firstly, it enhances the overall appearance of the installation by providing a clean and refined look to the edges. Secondly, finishing helps protect the edges from moisture, dirt, and wear, preventing potential damage and extending the lifespan of the flooring. Lastly, finishing reduces the risk of tripping or snagging on uneven or jagged edges, promoting safety within the space.
Recommend suitable finishing techniques or materials: There are various techniques and materials you can use to finish the cut edges of vinyl flooring. Here are some commonly recommended options:
- Edge Trims: Vinyl flooring edge trims, also known as transition strips or molding, provide a neat and professional finish along the edges. These trims come in different profiles and materials, such as metal or PVC, and can be selected to complement the overall design and style of the flooring. They can be easily installed using adhesive or screws, depending on the type of trim.
- Heat Welding: Heat welding is a technique that fuses the cut edges of vinyl flooring together using heat and specialized tools. This method creates a seamless and durable bond, particularly suitable for commercial settings or areas prone to moisture. Heat welding requires professional expertise and specialized equipment, so it is recommended to consult with an experienced installer for this finishing technique.
- Adhesive Sealants: Using adhesive sealants specifically designed for vinyl flooring can help seal and protect the cut edges. These sealants provide a barrier against moisture, preventing water infiltration and potential damage. Follow the manufacturer’s instructions for applying and curing the adhesive sealant properly.
Address post-cutting maintenance and cleaning requirements: After cutting vinyl flooring and completing the finishing touches, it is important to follow post-cutting maintenance and cleaning procedures to maintain the flooring’s quality and appearance. Here are some general guidelines:
- Remove any debris or sawdust: Thoroughly clean the area and remove any sawdust or debris generated from the cutting process. Use a broom, vacuum, or a damp cloth to ensure the surface is clean and free from particles.
- Regular maintenance: Follow the manufacturer’s guidelines for regular maintenance, including routine cleaning and maintenance procedures specific to the type of vinyl flooring installed. This may involve using suitable cleaning solutions, tools, and techniques to keep the flooring in optimal condition.
- Protect the finished edges: Take care when moving furniture or heavy objects across the finished edges to avoid causing damage. Consider using furniture pads or protective covers to minimize the risk of scratching or scuffing the finished edges.
By giving attention to the finishing of the cut edges, using appropriate finishing techniques or materials, and adhering to post-cutting maintenance and cleaning requirements, you can ensure a professional and long-lasting result for your vinyl flooring installation.
Best Practices for Cutting Vinyl Flooring
To ensure successful and precise cuts when using a table saw to cut vinyl flooring, it is important to follow best practices and employ proper cutting techniques. Here’s a summary of key points and tips for achieving optimal results:
- Measure and mark accurately: Take precise measurements and mark the cutting lines clearly on the vinyl flooring to ensure accurate cuts and proper fitting during installation.
- Choose the right blade: Select a fine-toothed blade specifically designed for cutting vinyl flooring. Ensure the blade is sharp and in good condition for clean and smooth cuts.
- Prioritize safety: Wear appropriate protective gear, including safety goggles or glasses, ear protection, and work gloves. Follow safety guidelines provided by the manufacturer for the table saw and other cutting tools.
- Secure the vinyl flooring: Use clamps, weights, or an extra pair of hands to ensure the vinyl flooring is securely positioned and supported during the cutting process, minimizing movement or flexing.
- Maintain a steady feed: Feed the vinyl flooring steadily and smoothly through the table saw, using push sticks or blocks to keep your hands at a safe distance from the blade. Avoid rushing or forcing the cuts to maintain control and precision.
- Double-check the alignment: Ensure the vinyl flooring is aligned properly with the rip fence or miter gauge to achieve parallel and consistent cuts. Make adjustments as necessary before cutting.
- Inspect and make adjustments: After each cut, inspect the quality of the cut and adjust as needed. This includes verifying the accuracy, smoothness, and cleanliness of the cut edge.
Benefits of following proper cutting techniques:
- Accurate and precise cuts: Proper cutting techniques result in clean and precise cuts, ensuring the vinyl flooring pieces fit together seamlessly, creating a professional-looking installation.
- Efficiency and time-saving: Following proper techniques reduces the need for adjustments, re-cuts, or time-consuming modifications, streamlining the overall cutting process.
Additional tips for achieving precise and clean cuts:
- Use a zero-clearance insert: A zero-clearance insert can help reduce tear-out and splintering on the underside of the vinyl flooring during cutting.
- Support long pieces adequately: For longer vinyl flooring pieces, have an extra person help support the material on both ends to maintain stability and prevent sagging or bending.
- Practice on scrap pieces: Before cutting the actual vinyl flooring, practice on scrap pieces to familiarize yourself with the cutting technique and make any necessary adjustments.
By following these best practices, you can ensure precise and clean cuts when using a table saw to cut vinyl flooring. This results in a smooth and professional installation, saving time and effort while achieving a high-quality end result.
Conclusion
In this article, we have covered essential information and provided guidance on cutting vinyl flooring with a table saw. Let’s recap the main points discussed:
- Vinyl flooring is a popular and versatile flooring option, known for its durability, moisture resistance, and aesthetic appeal.
- Using a table saw for cutting vinyl flooring offers advantages such as precise and straight cuts, efficiency, and speed.
- Safety precautions, including wearing protective gear and properly setting up and handling the table saw, are crucial for a safe working environment.
- Preparing the vinyl flooring involves measuring accurately, marking the cutting lines, and ensuring the flooring is securely positioned for cutting.
- Proper cutting techniques are important for accurate and clean cuts, while common mistakes should be avoided to achieve a successful flooring installation.
- Finishing the cut edges of vinyl flooring and following post-cutting maintenance and cleaning requirements contribute to a polished result and prolonged flooring lifespan.
- Best practices for cutting vinyl flooring with a table saw include accurate measuring and marking, choosing the right blade, prioritizing safety, maintaining steady feeding, and inspecting and adjusting as needed.
- Following proper cutting techniques ensures precise cuts, efficiency, and a professional-looking installation.
Using a table saw for cutting vinyl flooring is highly significant due to its ability to provide accurate, clean, and efficient cuts. By adopting safe and accurate cutting practices, you can achieve a successful vinyl flooring installation with a visually appealing and durable result.
Remember to prioritize safety, follow manufacturer guidelines, and utilize the proper tools and techniques. Whether you’re embarking on a DIY flooring project or working as a professional, the use of a table saw, combined with proper cutting techniques, will contribute to a seamless and rewarding vinyl flooring experience.