A well-maintained cast iron table saw top is a crucial component of any woodworking workshop. Its smooth and flat surface ensures accurate cuts and promotes the overall efficiency and safety of the woodworking process. In this article, we will delve into the importance of maintaining a cast iron table saw top, provide a brief overview of the restoration process, and highlight the numerous benefits of regular maintenance.
A cast iron table saw top serves as the foundation for all woodworking projects. Its stability and flatness are paramount for achieving precise cuts and ensuring the quality of the final product. Over time, however, the table saw top can become worn, damaged, or accumulate rust, diminishing its performance and compromising the accuracy of the cuts.
Restoring a cast iron table saw top involves a series of steps to rejuvenate its surface and bring it back to its optimal condition. By following these restoration techniques, woodworkers can regain a smooth and flat surface, improving the accuracy and safety of their cuts.
While restoration is crucial to revive an old or damaged table saw top, regular maintenance plays an equally important role in prolonging its lifespan and performance. By implementing a consistent maintenance routine, woodworkers can prevent rust, protect the surface, and ensure the table saw top remains in excellent working condition.
The benefits of regular maintenance extend beyond the longevity of the table saw top. By keeping the surface clean, smooth, and rust-free, woodworkers can achieve accurate and precise cuts, leading to higher-quality woodworking projects. Additionally, a well-maintained table saw top reduces the risk of accidents and enhances overall workshop safety.
In the following sections, we will explore the steps involved in restoring a cast iron table saw top, discuss effective maintenance practices, and provide valuable tips to help you develop and maintain these habits. By following these guidelines, you can optimize your woodworking experience and achieve outstanding results.
Understanding the Cast Iron Table Saw Top
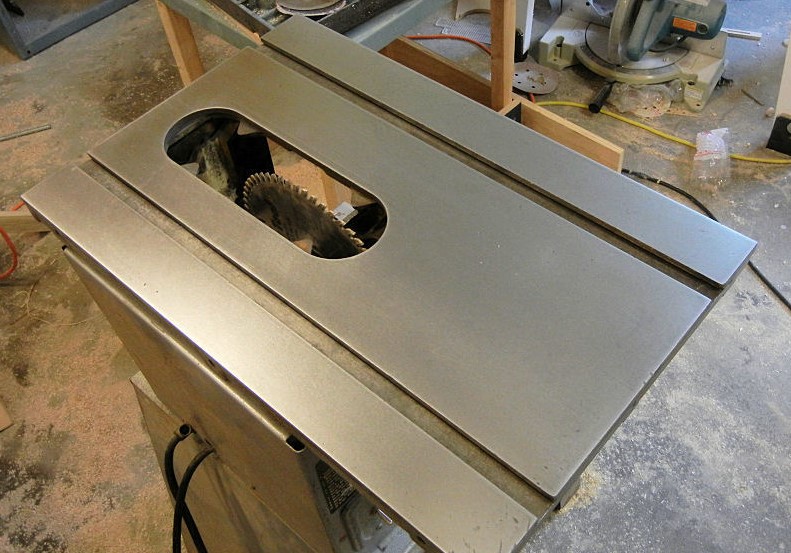
The table saw top is the flat, sturdy surface on which the workpiece rests during cutting operations. It is typically made of cast iron due to its exceptional durability and stability. The composition of cast iron provides the table saw top with excellent resistance to vibrations, ensuring a more accurate and precise cutting experience.
The primary purpose of the table saw top is to provide a stable and flat platform for the workpiece and the cutting blade. It acts as a reference surface against which the workpiece is guided, enabling precise cuts and consistent results. The flatness and smoothness of the table saw top are crucial factors in achieving accurate and reliable cuts.
A flat table saw top is essential because any unevenness or imperfection can lead to inaccurate cuts and compromise the quality of the woodworking project. Even minor irregularities can cause the workpiece to wobble or shift during cutting, resulting in imprecise angles and inconsistent measurements.
The smoothness of the table saw top plays a vital role in reducing friction and facilitating the smooth movement of the workpiece. It minimizes the risk of wood binding or sticking to the surface, ensuring smoother and safer cuts. A smooth table saw top also allows for easy sliding of jigs, sleds, and other accessories used in woodworking.
Several factors can contribute to damage and wear on the table saw top. One common cause is moisture or exposure to humidity, which can lead to rust formation on the surface. Rust not only affects the smoothness of the table saw top but can also compromise its structural integrity over time.
Another cause of damage is accidental impact or contact with sharp or abrasive materials. Dropping heavy objects or allowing tools to come into direct contact with the table saw top can result in dents, scratches, or even chipping. Continuous use of the table saw, especially with rough or abrasive workpieces, can also cause wear and tear over time.
Understanding these factors and their impact on the table saw top is crucial for effectively restoring and maintaining its optimal condition. In the following sections, we will explore the steps involved in assessing the table saw top’s condition, restoring its surface, and implementing regular maintenance practices to ensure its longevity and performance.
Assessing the Condition of the Table Saw Top
To restore and maintain a cast iron table saw top effectively, it is crucial to assess its condition accurately. Here is a step-by-step guide to visually inspecting the table saw top, identifying signs of damage, and measuring flatness:
- Clean the Surface: Before assessing the condition, ensure that the table saw top is free from dust, debris, and any existing coatings. Use a clean cloth or a mild cleaning solution to remove any residue.
- Visual Inspection: Carefully examine the entire surface of the table saw top. Look for signs of rust, pitting, scratches, dents, or any other visible damage. Take note of the areas that require attention during the restoration process.
- Rust Identification: Rust is a common issue on cast iron surfaces. Look for areas with reddish-brown discoloration or rough patches. Rust may appear as small spots or cover larger areas. It is essential to identify the extent of rust for proper restoration.
- Pitting Assessment: Pitting refers to small, crater-like depressions on the surface of the table saw top. Inspect the surface closely for these imperfections, as they can affect the flatness and smoothness of the top. Pitting is often caused by corrosion or impact damage.
- Damage Evaluation: Check for scratches, dents, or chips on the table saw top. These can be the result of accidental impacts, contact with abrasive materials, or improper handling. Note the severity of the damage and assess if it requires specific attention during the restoration process.
- Flatness Measurement: Flatness is crucial for accurate cuts. To measure flatness, use a precision straightedge or a reliable straightedge tool. Place the straightedge across the table saw top at various points, such as near the blade and along the length and width. Look for any gaps between the straightedge and the surface. These gaps indicate high or low spots that need to be addressed during the restoration process.
- Diagnosing Imperfections: Based on the flatness measurement, identify any specific imperfections, such as dips, humps, or twists in the table saw top. Understanding these imperfections will help you plan the restoration process effectively and prioritize the required steps.
By following this assessment process, you will have a clear understanding of the condition of your table saw top and the specific areas that need restoration. In the next section, we will discuss the steps involved in preparing for the restoration process, including the tools and materials required.
Preparing for Restoration
Before embarking on the restoration process for your cast iron table saw top, it is essential to gather the necessary tools and materials and ensure the implementation of proper safety precautions. Additionally, cleaning the table saw top to remove dirt and debris is a crucial first step. Let’s explore each aspect in detail:
Tools and Materials:
- Safety goggles and gloves: Protect your eyes and hands during the restoration process.
- Cleaning supplies: Use a mild cleaning solution, such as a mixture of water and dish soap, along with clean cloths or sponges.
- Rust removal tools: Depending on the extent of rust, you may need steel wool, abrasive pads, or rust removal solutions.
- Sandpaper: Select various grits of sandpaper (e.g., 120, 220, and 400) for smoothing the surface.
- Precision straightedge: This tool helps in assessing flatness and diagnosing imperfections.
- Scraper or putty knife: Useful for removing stubborn debris or old coatings.
- Paste wax or protective coating: Apply a suitable paste wax or protective coating to prevent future rust and enhance surface smoothness.
- Microfiber cloths: These are ideal for applying wax and achieving a polished finish.
Safety Precautions:
- Wear safety goggles and gloves throughout the restoration process to protect your eyes and hands from potential injuries.
- Ensure proper ventilation in your workspace to minimize the inhalation of dust or fumes from cleaning agents or coatings.
- Follow the manufacturer’s instructions and warnings when using rust removal solutions or other chemicals.
- Use caution when handling sharp tools or abrasive materials to prevent cuts or injuries.
Cleaning the Table Saw Top:
- Start by removing any loose debris or sawdust from the surface using a brush or vacuum cleaner.
- Prepare a mild cleaning solution by mixing water and dish soap in a bucket or spray bottle.
- Dampen a clean cloth or sponge with the cleaning solution and gently wipe the entire surface of the table saw top.
- Pay special attention to areas with built-up dirt or residue. Use a scraper or putty knife to remove stubborn debris or old coatings.
- Rinse the table saw top with clean water to remove any soap residue.
- Dry the surface thoroughly using clean, dry cloths or allow it to air dry completely before proceeding with the restoration process.
By preparing the necessary tools and materials, implementing proper safety precautions, and starting with a clean table saw top, you will be well-prepared to begin the restoration process. In the next section, we will discuss effective methods for removing rust and stains from the table saw top.
Removing Rust and Stains
Rust and stains can significantly impact the performance and appearance of your cast iron table saw top. In this section, we will explore different methods for rust removal, provide a step-by-step process for effective rust removal, and offer tips for tackling stubborn stains and discoloration.
Different Methods for Rust Removal:
- Chemical Solutions: Rust removal solutions or products specifically designed for removing rust can be effective. Follow the manufacturer’s instructions for application and safety precautions.
- Abrasive Pads or Steel Wool: Coarse or medium-grit abrasive pads or steel wool can be used to physically remove rust. Ensure you are using a suitable abrasive that is not too harsh to avoid damaging the table saw top.
Step-by-Step Process for Removing Rust Effectively:
- Apply the chosen rust removal solution or spray it onto the affected areas.
- Allow the solution to sit for the recommended duration, ensuring it does not dry on the surface.
- Use a scrub brush, abrasive pad, or steel wool to gently scrub the rusted areas in a circular motion.
- Rinse the table saw top with clean water to remove any residual solution.
- Dry the surface thoroughly using clean, dry cloths.
Tips for Tackling Stubborn Stains and Discoloration:
- For stubborn stains, mix a paste of baking soda and water or lemon juice and apply it to the affected areas. Allow it to sit for a while before gently scrubbing with an abrasive pad or steel wool.
- If the stains persist, try using a rust remover or a specialized stain remover formulated for cast iron surfaces. Follow the instructions carefully.
- For deep-seated stains or discoloration, sanding with progressively finer grits of sandpaper may be necessary. Start with a coarser grit and gradually work your way to a finer grit for a smooth finish.
Remember to always work in a well-ventilated area and follow safety precautions when using chemicals or abrasive materials. Take breaks as needed to prevent fatigue and ensure accurate and thorough rust removal.
Once you have successfully removed rust and stains from your table saw top, you can proceed to the next step of smoothing and refinishing the surface. We will discuss this in detail in the next section.
Smoothing and Refinishing the Table Saw Top
After successfully removing rust and stains from your cast iron table saw top, the next step is to focus on achieving a smooth surface and applying protective coatings for long-term maintenance. In this section, we will discuss sanding techniques, applying protective coatings, and provide recommendations for refinishing products based on user reviews and studies.
Sanding Techniques for Achieving a Smooth Surface:
- Start with a medium-grit sandpaper, such as 120 or 150, and sand the entire surface of the table saw top in a consistent, circular motion. This helps to even out any remaining imperfections.
- Gradually progress to finer grits, such as 220 and 400, for a smoother finish. Repeat the sanding process with each finer grit to refine the surface further.
- Keep the sandpaper clean by periodically wiping it or replacing it to prevent clogging and ensure effective sanding.
Applying Protective Coatings:
- Once the table saw top is smooth, it is crucial to apply a protective coating to prevent rust and maintain the surface’s integrity.
- Paste wax: Apply a thin, even layer of high-quality paste wax to the entire table saw top. Allow it to dry according to the manufacturer’s instructions, then buff the surface with a clean microfiber cloth to achieve a protective and smooth finish.
- Rust inhibitor: Some woodworkers prefer using rust inhibitors specifically designed for cast iron surfaces. Follow the instructions provided by the manufacturer for the application process and recommended drying time.
Recommendations for Refinishing Products:
- When choosing refinishing products, it is helpful to consider user reviews and studies. Look for products that have consistently positive feedback from woodworkers who have successfully restored and maintained their cast iron table saw tops.
- Conduct research on reputable woodworking forums, blogs, and websites to gather insights and recommendations on refinishing products for cast iron surfaces.
- Consult with local woodworking experts or professionals who have experience in restoring cast iron table saw tops to get their recommendations on reliable products.
Remember to read and follow the instructions provided by the manufacturers of sandpaper, paste wax, rust inhibitors, or any other refinishing products. Regularly inspect the table saw top for signs of wear and reapply the protective coating as needed to maintain its smoothness and prevent rust.
In the next section, we will explore the importance of aligning and leveling the table saw top to ensure accurate and precise cuts.
Aligning and Leveling the Table Saw Top
Achieving a level surface on your cast iron table saw top is crucial for ensuring accurate and precise cuts. In this section, we will discuss the importance of a level surface, the process of adjusting trunnions and aligning the blade with the miter slots, and the tools needed for leveling.
Importance of a Level Surface for Accurate Cuts:
- A level table saw top provides a consistent reference point for the workpiece and the cutting blade, ensuring precise and accurate cuts.
- Uneven surfaces can cause the workpiece to wobble or tilt during cutting, leading to imprecise angles, inconsistent measurements, and compromised safety.
Adjusting the Trunnions and Aligning the Blade with the Miter Slots:
- Trunnions are the mechanisms that support the arbor assembly and allow for blade tilt adjustments. Proper alignment of the trunnions ensures that the blade is parallel to the miter slots.
- Consult your table saw’s manual for specific instructions on adjusting the trunnions. It usually involves loosening specific bolts or screws, making adjustments, and then tightening them back in place.
- Align the blade with the miter slots by adjusting the trunnions until the blade runs parallel to the miter slots from front to back.
Using a Precision Straightedge and Feeler Gauges for Leveling:
- A precision straightedge, such as a machinist’s straightedge or a reliable straightedge tool, is essential for checking the flatness of the table saw top.
- Place the straightedge across the table saw top in different directions, including near the blade and along the length and width. Look for any gaps between the straightedge and the surface.
- Use feeler gauges, which are thin strips of metal of various thicknesses, to measure the gaps between the straightedge and the surface. This allows you to identify specific areas that require leveling.
- Adjust the leveling screws or mechanisms on your table saw based on the measurements taken with the feeler gauges. Gradually make small adjustments until the table saw top is level.
By ensuring a level surface, adjusting the trunnions, and aligning the blade with the miter slots, you can enhance the accuracy and precision of your table saw cuts. Regularly check and re-level the table saw top as part of your maintenance routine to maintain optimal performance.
In the next section, we will discuss the importance of establishing good maintenance habits to prevent future damage and ensure the longevity of your cast iron table saw top.
Establishing Good Maintenance Habits
Establishing good maintenance habits for your cast iron table saw top is essential to prevent future damage, ensure its longevity, and maintain optimal performance. In this section, we will provide tips for preventing damage and wear, establishing regular cleaning and inspection routines, and implementing proper storage practices.
Tips for Preventing Future Damage and Wear:
- Avoid placing heavy or sharp objects directly on the table saw top to prevent dents, scratches, or chips. Use appropriate supports or protective materials when needed.
- Clean the table saw top immediately after each use to remove sawdust, debris, or any other residue that can potentially lead to corrosion or surface damage.
- Be mindful of the materials being cut on the table saw. Certain woods, metals, or abrasive materials can cause faster wear and tear on the table saw top. Take precautions such as using sacrificial boards or protective coatings for such materials.
Regular Cleaning and Inspection Routines:
- Establish a regular cleaning routine by wiping down the table saw top with a clean, dry cloth or brush after each use. This helps remove any residual dust or debris and prevents buildup.
- Periodically perform a more thorough cleaning using a mild cleaning solution to remove any stubborn residue or contaminants. Ensure the table saw top is completely dry after cleaning to prevent moisture-related issues.
- Regularly inspect the table saw top for signs of rust, pitting, or other damage. Catching and addressing these issues early can prevent them from worsening and affecting the performance of the table saw.
Proper Storage Practices to Protect the Table Saw Top:
- When not in use, cover the table saw top with a dedicated table saw cover or a clean, breathable cloth to protect it from dust, moisture, and other environmental elements.
- Avoid storing materials or tools on top of the table saw to prevent any accidental damage or pressure that can lead to warping or distortion.
- If your workshop experiences high humidity, consider using a dehumidifier or moisture-absorbing materials to reduce the risk of rust formation.
By following these maintenance tips, you can significantly prolong the lifespan of your cast iron table saw top and ensure consistent performance over time. Regular cleaning, inspection, and proper storage practices are key to keeping the surface in excellent condition.
In the next section, we will explore the advantages of using a table saw sled and how to build one for enhanced accuracy and safety in your woodworking projects.
Advantages of Using a Table Saw Sled
Using a table saw sled can greatly enhance the accuracy and safety of your woodworking projects. In this section, we will introduce table saw sleds, discuss their benefits, provide instructions on building a basic table saw sled, and explore advanced features and designs for specialized cuts.
Introduction to Table Saw Sleds and Their Benefits:
- A table saw sled is a sled-like device that slides along the table saw top and provides a stable and controlled platform for guiding workpieces during cuts.
- Table saw sleds offer several benefits, including increased accuracy, improved safety, and the ability to make repeatable and precise cuts.
- The sled acts as a support for the workpiece, preventing it from shifting or tipping during cuts, resulting in cleaner and more accurate cuts.
How to Build a Basic Table Saw Sled for Enhanced Accuracy and Safety:
- Start by selecting a sturdy and flat material for the base of the sled, such as plywood or medium-density fiberboard (MDF).
- Cut the base to the desired size, ensuring it fits securely on the table saw top without interfering with the blade’s operation.
- Attach runners or rails on the underside of the sled base to provide smooth and precise movement along the miter slots.
- Install a back fence perpendicular to the sled base to serve as a reference for guiding the workpiece.
- Consider adding hold-down clamps or toggle clamps to secure the workpiece firmly in place during cuts.
Exploring Advanced Features and Designs for Specialized Cuts:
- For specialized cuts, such as box joints or mitered corners, advanced table saw sleds with additional features may be required.
- Advanced sleds may include adjustable fences for making angled cuts, removable inserts for zero-clearance support, or dedicated jigs for specific joinery techniques.
- Research and explore different designs and features based on your specific woodworking needs and projects.
Table saw sleds are versatile tools that enhance the accuracy and safety of your cuts. By following the instructions to build a basic sled and considering advanced features for specialized cuts, you can greatly improve the quality of your woodworking projects.
In the next section, we will discuss recommended accessories for table saw maintenance to further protect and maintain the table saw top’s condition.
Recommended Accessories for Table Saw Maintenance
To protect and maintain the condition of your table saw top, several accessories can be beneficial. In this section, we will discuss essential accessories for protecting and maintaining the table saw top, as well as additional tools to enhance accuracy and productivity.
Essential Accessories for Protecting and Maintaining the Table Saw Top:
- Table Saw Cover: A table saw cover helps keep dust, dirt, and other debris from accumulating on the table saw top, preventing potential damage and corrosion.
- Magnetic Featherboards: Magnetic featherboards attach to the table saw fence and provide additional support and guidance for the workpiece, reducing the risk of kickbacks and ensuring safer cuts.
- Anti-Static Cleaning Solutions: Anti-static cleaning solutions can be used to remove dust and static build-up from the table saw top, minimizing the attraction of debris and maintaining a clean surface.
Additional Tools to Enhance Accuracy and Productivity:
- Zero-Clearance Inserts: Zero-clearance inserts are custom throat plates that provide support around the blade, reducing tear-out and improving the accuracy of cuts, especially for fine or delicate materials.
- Digital Angle Gauge: A digital angle gauge helps ensure precise and consistent angles when setting up the blade or adjusting the table saw’s miter gauge. It provides accurate measurements for bevel cuts or angled joints.
- Outfeed Support: An outfeed support system, such as roller stands or collapsible tables, can be used to support longer workpieces as they exit the table saw, preventing them from sagging or falling and allowing for smoother cuts.
By using these recommended accessories, you can effectively protect and maintain your table saw top while enhancing accuracy and productivity in your woodworking projects. Consider investing in accessories that suit your specific needs and workflow.
In conclusion, a well-maintained cast iron table saw top is crucial for accurate and safe woodworking. We have covered the importance of maintenance, steps for restoration, tips for prevention, alignment techniques, advantages of using a table saw sled, and recommended accessories. By following these guidelines, you can ensure optimal performance and longevity for your table saw top. Remember to regularly inspect, clean, and maintain your table saw top to enjoy its benefits for years to come.
Conclusion:
In conclusion, restoring and maintaining a cast iron table saw top is essential for achieving accurate cuts, ensuring safety, and optimizing your woodworking experience. Throughout this article, we have covered the restoration process, maintenance tips, and various techniques to enhance the performance of your table saw top.
To recap the restoration process, it begins with understanding the composition and purpose of the table saw top. We discussed the importance of a flat and smooth surface and identified common causes of damage and wear. The assessment of the table saw top’s condition involves a step-by-step visual inspection, identifying rust, pitting, and other signs of damage, as well as measuring flatness and diagnosing imperfections.
Preparing for restoration requires gathering the necessary tools and materials, following safety precautions, and cleaning the table saw top to remove dirt and debris. Removing rust and stains involves different methods such as chemical solutions or abrasive pads, with a step-by-step process outlined for effective rust removal. We also provided tips for tackling stubborn stains and discoloration.
After restoring the table saw top, we discussed the importance of smoothing and refinishing the surface. This includes sanding techniques for achieving a smooth surface and applying protective coatings such as paste wax or rust inhibitors. We also recommended refinishing products based on user reviews and studies.
Aligning and leveling the table saw top was emphasized as an important step for accurate cuts. Adjusting the trunnions, aligning the blade with the miter slots, and using precision straightedges and feeler gauges were discussed as techniques for achieving a level surface.
Establishing good maintenance habits, including preventing future damage, regular cleaning and inspection routines, and proper storage practices, was highlighted as a crucial aspect of maintaining the table saw top’s longevity and performance.
We also explored the advantages of using a table saw sled, the process of building a basic sled, and the potential for advanced features and designs to suit specialized cuts. Additionally, we recommended essential accessories for table saw maintenance, as well as additional tools to enhance accuracy and productivity.
In conclusion, a well-maintained cast iron table saw top is vital for achieving high-quality woodworking results. We encourage you to implement the outlined steps and tips for restoration and maintenance to optimize the performance and lifespan of your table saw top. By doing so, you will ensure accurate cuts, improve safety, and enjoy a smooth and efficient woodworking experience.